
History of diamond cutting
Diamond industry grown fast in Holland In the 16th century, Antwerpen and Amsterdam where major harbors for the direct sea route to India, where diamonds where then found. Due to the inquisition and the religious persecution in Spain, Portugal Germany and Poland, many people fled to Antwerpen and Amsterdam. Here some settled as diamond cutters, a craft which had no guild. In the old Dutch Republic of the 16th and 17th century, economy was booming. This initiated and stimulated the demand for more jewelry and a highly concentrated trade and industry started in the old Dutch harbors of Amsterdam and Antwerpen (now a city in Belgium).
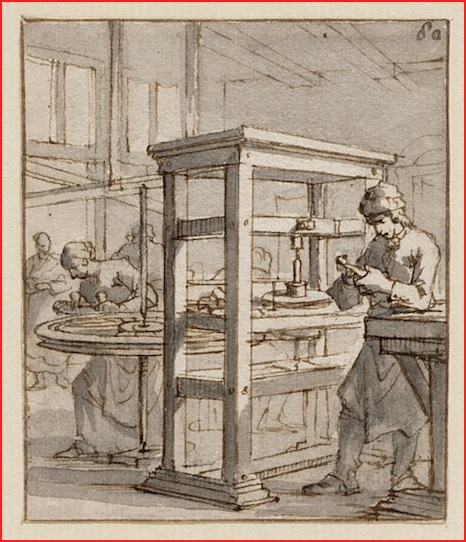
Industry demands higher precision In the 19th century the industrial revolution pushed technology upwards. By the introduction of all kind of new materials and the higher specification of products and processes, some unique physical properties of diamond were recognized. Diamond also became more used as tool instead as jewel. More and more were needed but as well, a higher quality was demanded. Diamond cutters started to specialize and the first specialized diamond tool companies were founded in the 20th century.
Sub Micron Tooling, a young company...but long experience at Philips, Mr. F. van Tongeren was having his profession as a diamond tool maker from 1938 onwards. His son, Mr. N. van Tongeren followed his father foot steps at Philips, and worked at Philips Diamond Tools from 1983-1995. In 1995 Mr. van Tongeren founded Sub Micron Tooling. Here, a 3rd generation from the van Tongeren's family joined the diamond tooling profession.

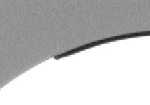
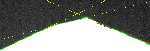
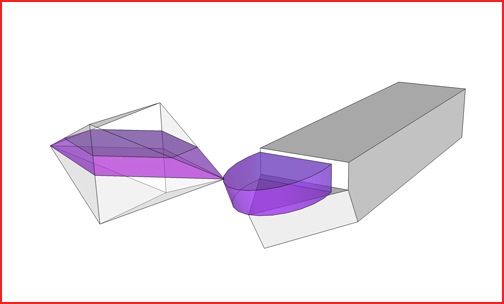
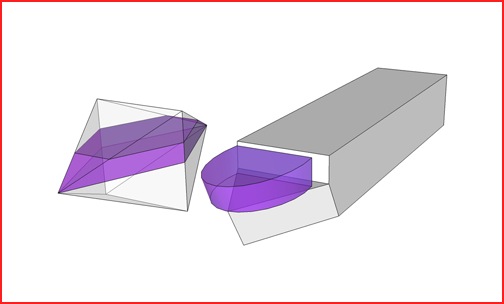
Examples Radius wear
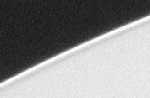
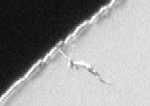
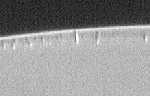
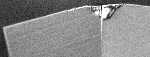
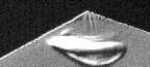
At 800 x with use of Interference you can see cutting edge wear; on the photo this is visible by the dark line just
behind the cutting edge.
Cutting edge wear is normal wear, caused by normal use.
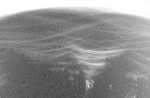
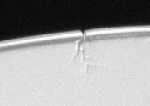
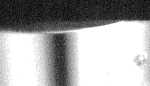
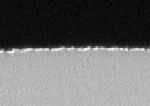
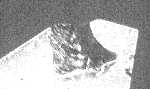
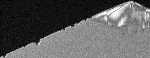
On this photo you can see stress in the diamond, particular in the radius part.
This stress is caused by the diamond grinding process of the radius...
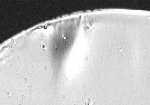
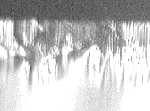
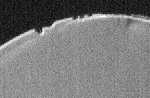
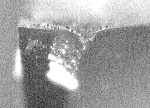
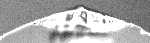
By higher magnification and the use of interference you can see cutting edge wear. A number of electrostatic discharges are found on the cutting edge, the largest discharge has created a kind of chip on the cutting edge. The electrostatic discharges are caused by sparks between tool and workpiece during use.
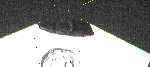
Heavy cutting edge wear, damage and chipping caused by electrostatic discharges.
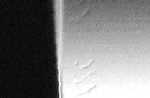
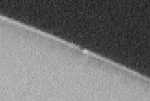
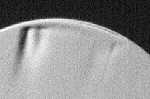
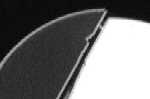
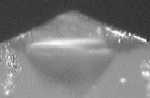
Shown is the front of the radius; severe wear on the clearance (or relief) of the tool. The clearance is damaged over a rather large part (~120µm deep).
By looking at the conical clearance of this tool with interference you can see damage on this part of the tool. This damage is being caused by material from workpiece during cutting and is similar to crater wear on the rake side of the tool. During relap this damage, as a result the decreasing height, is found back in the cutting edge as tiny chips or irregularities.
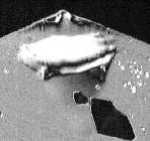
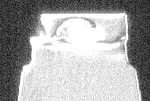
Severe form wear (application is aluminium optical mold production) as seen from the top and as seen from the front, where the radius cone is visible.
Cutting edge wear, Crater wear, Chips, Form wear.
Crater wear is caused by the chip, hitting the rake face of the tool while being very hot (can be up to over 1200°C).
However the wear is visibly big (leaving a kind of a crater) it is rather undeep: just ~3µm deep!!!.
At 1000x magnification with use of interference you can see cutting edge wear and some irregularities plus a very small chip. This wear is caused by normal use.
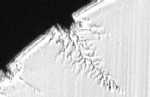
At 800 x Nomarski you can see cutting edge wear + electrostatic discharges. Chipping has also heavy damaged the cutting edge.
At 800 x Nomarski you can see al large number of very small chips.
These chips are probably caused by tension or stress in the diamond (due to forcing during grinding the radius).

Cutting edge wear(double line behind the cutting edge) By using the interference you see crater wear . (also are there
lines on the diamond caused by relapping of the tool).
Cutting edge wear and crater wear are caused by normal use of the tool.
Crater wear is being caused by material from the workpiece while cutting.

Cutting edge wear , light crater wear, light chipping and light damage on the cutting egde, severe form wear
(deformation of the original radius shape).
Also shown is the front of the radius; severe wear and damage on the clearance (or relief) of the tool. The clearance is
damaged over a rather large part (~150µm deep).
Crater wear on centre and centre left side of the radius. Cutting edge wear (edge is slightly rounded off) on centre and
centre left side of the radius.
Light damage on the edge and clearance of the tool due to electrostatic discharges.
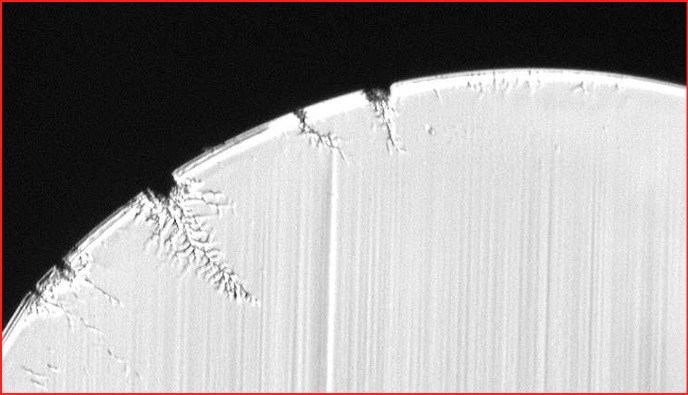
Diamond is cracked due to some accident. The crack is making the weak orientation visible of the diamond.

Severe cuttig edge wear + form wear + crater wear + large chips, all causing rings on the surface of the lens. As
visible, a kind of finger print is left behind...
Also note the severe form wear on the right side, used for roughing.


Severe cuttig edge wear + form wear + clearance wear, all causing rings on the surface of the lens. In this case the
rings are formed by burning zones, as material is not being cut but rather forced off.
Application: single point turning on Gfeller lathe.
Styli wear patterns gallery
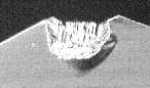
This type of wear is created during the engraving process. The original sharp tip wears down as it is being used longer, or more intensive, and finally becomes blunt. In some cases it will wear down and form a sort of a radius shape.

The part of the tool which is used for cutting (engraving ) can be defined as the cutting edge .Engraving a copper cylinder is actually a cutting or lathe process, and therefore you can define the two sides of the tip as a cutting edge . Like the tip, the cutting edge is subject to a similar wear process. The edge will wear down more as it is being used longer or more intensive. In practice this means that the edge will round off and become blunt.

During th engraving, the diamond is being used to cut a cell shape in a copper cylinder. During this cutting process, cell material that is actually cut out of the cylinder, flows along the tip and sides of the styli. Due to this flow of chip material the clearances and rake will wear down. As tools are being used for a longer period, this type of wear will increase. By the shape of the wear pattern on the rake of the diamond, one can sometimes tell the direction of the air flow, for chip removal. Sometimes the wear shape can also tell something about the cell symmetry. (Note: on the 1st picture, the black silhouettes are remains of copper engraved cells.)

Theoretically the clearances, or relief angles, of the styli are these parts of the tool tip that during cutting are not in contact with the cylinder. Though it is subject to wear in two ways; the clearance comes in touch with the copper as the tip cuts in and out of the cylinder due to which it will wear. The second way is that due to the chip removal, and chips flowing over the clearances, crater wear will develop on these parts of the styli.
Chips break out of the tip and cutting edge of the diamond . This phenomenon can be due to several different causes. The
tool is vibrating during cutting. The tool is bumping instead of a making gentle cutting motion. Diamond is very hard
but also brittle and sensitive for vibration. An inferior diamond quality or a bad cutting quality can also contribute
to this phenomenon. Stress in the diamond, inclusions, disturbances in the crystal lattice can all have a negative
effect on the quality of the diamond as a tool. The last cause of chipping can be found in very long or intensive use.
The tip and edges will wear down completely and become blunt, due to which cutting forces will rise and result into
chipping.
As can be seen on the 2nd and 3rd picture (taken from one single tool), the chip doesn't always break down deeply but
can be big though shallow.
Tiny pieces or particles of diamond break out of the tip and the edge. See also "Chips".

This type of damage can originate in the same way as described above. Big difference is that the sides are not used for cutting . This type of damage is not process related. It can be caused by cleaning the tool tip due to which the diamonds are damaged.
This type of wear can be characterised as a deformation of the original shape. It is caused by the wearing of the tip and sides. Form wear will appear only after long use and has an effect on the quality of the engraved cells and their shape. This wear type can give information on the symmetry. When one side is more worn than the other, this can indicate that it is not cutting well. As a result it will not cut symmetric cells.

The tip of the diamond is completely broken. The cause of this must be found in a complex whole of different parameters. All previously mentioned factors, all process parameters (of making and using diamond tools) plus the quality of the copper cylinder can have an effect, or have influence on each other. The differences between chips and fractures are subtle.
One of the properties of diamond is the difference in hardness in different directions of the crystal. In some directions diamond can easy be cleaved while in some directions this is nearly impossible. These differences in hardness are related to the orientation of the crystal lattice. In some cases the diamond breaks during use in the direction or along such a cleavage plane. Because it breaks along the cleavage plane of the diamond a new sharp tip is being formed with a different included angle. The cause for this can be found in a combination of physical properties of the diamond, and all previous named causes which can lead to fracture.
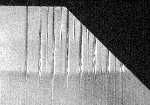
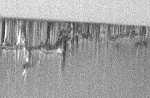
An example of typical wear on burr cutters. The regularity of the distances between the wear lines are very common on burr cutters and shoes.

V-groove
Grooving tool.

Grooving tool; typical clearance wear due to the tight relief angles.
Extreme form wear + crater wear on very small grooving tool.
Application: grooving lines at 200 periods per mm, turned on Hembrug lathe.
Diamond orientations
The chrystal orientation is recognisable by the visible growing lines.

Visible growing lines in synthetic monocristal 4-point orientation [001].[001]

Visible growing lines inside of diamond.
Visible Ent Cristal; the synthetic Borium doped. Orientation: [1.0.0.].[1.0.0.]
Distortion in orientation of diamond. Shifted pattern in growing lines.

Static discharges
Manual for use and handling of diamond tools
Why a manual for diamond tools?
Diamond is often a synonym for expensive, rare and mysterious. These definitions are strongly associated with the jewel
industry which propagates this image for commercial reasons. The diamond tool industry is strongly related to the jewel
industry. Toolmakers are coming from this industry or are in an indirect way influenced by it. The above described image
is not only propagated to the outside world but also within the diamond tool industry.
Specially the mysterious haze surrounding diamond is responsible for confusion and obscurity among the users of diamond
tools. Often the industry is only indicating what you are not allowed to do, "do not touch the diamond with your
fingers......it is very sharp!" This manual is not supposed to be a list of do’s and don’ts, but rather a practical
guide.
Packing of diamond (for transportation)
There are many creative ways in packing diamond tools. Every supplier has their own solution. We as well have a standard
package that is evaluated often.
The main point every package must comply to is that it prevents the diamond from bumping against hard surfaces. Diamond
of course is very hard but also brittle. To prevent the diamond from bumping against other surfaces, it can be
surrounded by cotton-wool. This will also work as a shock absorber during transportation. Always use new, clean pure
cotton-wool and change them every time before transport. This way you assure that there is no dirt in the cotton-wool
damaging the diamond tip. Preferable is a package in which the tip of the diamond is not touching any material.
By the way, never mention on the outside of parcel that there are diamonds inside.
Cleaning
There are several possible reasons for cleaning the diamond or tool. For instance, when material builds up (or chip
material) on the diamond or holder and causes problems during use. This material built up or chip material can be
removed by wiping carefully over the rake side of the diamond with a (pure) cotton bud soaked with alcohol or acetone.
Always wipe away from the tip or edge, never towards the tip of the diamond. After use throw away the cotton-bud, it is
not good for reuse. When you are cleaning the diamond with a cotton-bud, small (metal) parts might come into the
cotton-bud. Reusing the cotton-bud and can damage the tip or edge of the diamond. Ultrasonic cleaning is a safer
alternative, the diamond is not touched while cleaning and therefore damage is quite impossible. While cleaning you
always run the risk of damaging the diamond, therefore by way of precaution always follow the above instructions. A
mouse pad is an ideal safe and soft workplace.
When tools are send for relap or repair it is not necessary to clean them first, the material built up or chip material
on the tool can give us information about the use, and damage will be minimised.
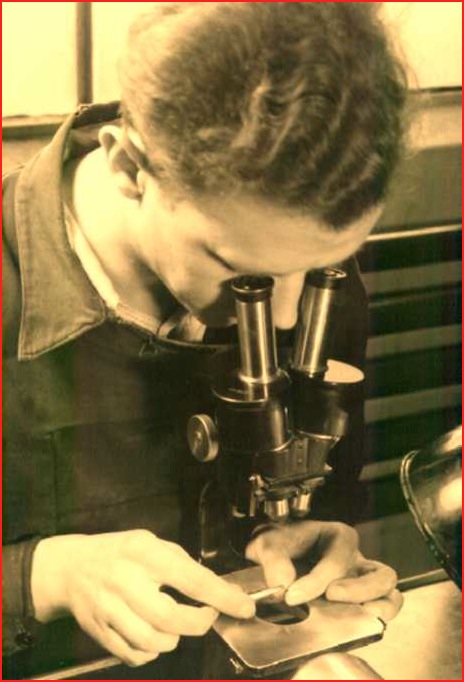
Inspection
When you need to inspect the diamond before use it is best not to clean before looking at it. In case you want, or need,
to clean first always follow the above instructions. Inspection can be best done using an interference microscope. A
normal microscope or magnifying glass makes it almost impossible to see the difference between damage, dirt or grease.
One of the properties of diamond is that it attracts grease. Even for the expert eye it is sometimes difficult to see,
at a magnification up to 1000 x with use of interference, the difference between a microchip and small particle of dirt.
With every repair , relap or new tool the measurement and image of end - inspection is stored. If needed this inspection
can be restored. By looking with polarised light trough a microscope, tension and cracks in the diamond, and even the
crystal lattice can be observed.
When you inspect the diamond after use the above guideline is also applicable. Of course you can always ask for a
detailed inspection report on your repaired tools.
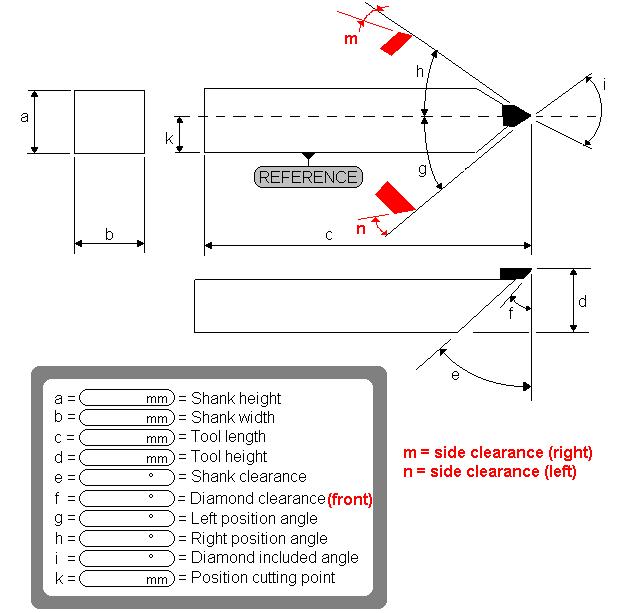
ISO insert and ISO holders
For many type of machines there are ISO insert systems available. The cemented carbide insert has standard dimensions. Sometimes users or suppliers adjust the insert, due to which the original fitting will change, and vibration of the tool is possible. The fitting of the ISO holder is supposed to be conform the specifications. Wear and damage to the holders is possible and can be responsible for bad cutting results. When mounting the inserts in the holder, clean both the bottom of the insert and the fitting. Always use the matching torx screw, for the 35° and 55° ISO insert is this a standard M 2,5 torx screw. Use a small and light wrench, a heavy wrench gives, when accidentally slipping more damage than a light one. This due to the difference in mass.
"Everything You Always Wanted to Know About Diamond Tools, .... But Were Afraid to Ask"
Fifteen most asked questions about diamond tools.
by: Nico van Tongeren, Sub Micron Tooling B.V., 1998.
Especially contact lens, IOL, and mould manufacturers aren't afraid asking about diamond tools, because they know the
diamond tool plays a very important role in the final lens quality and production price. In general they have a lot of
knowledge regarding lens design, (lens) materials and even lathes.
However during the last 15 years, visiting, and talking to customers, I became more and more aware of the need for
explanation regarding diamonds in general, their use, parameters etc.:
1. Why use diamond tools for contact lens cutting?
The fact that diamond is the hardest material, and a single crystal (the cutting edge can be grind extremely sharp) makes it very suitable as a cutting tool.
2. Are all diamonds the same?
Diamonds are found all over the world and have been formed under different circumstances. All kind of elements, impurities are "built in", so one can imagine that this has it's influence on the behaviour of the diamond tool.
3. Is there a difference between "industrial" diamonds and diamonds for jewellery?
Diamonds for jewellery (gem stone quality) are selected to perform, after polishing, as a jewel: shiny, clear, near
white and no inclusions to be seen.
Diamonds used for cutting tools, are selected based upon their use: so yellowish stones are acceptable, but inclusions
can affect the performance of a diamond tool and have to be avoided, at least near the cutting edge.
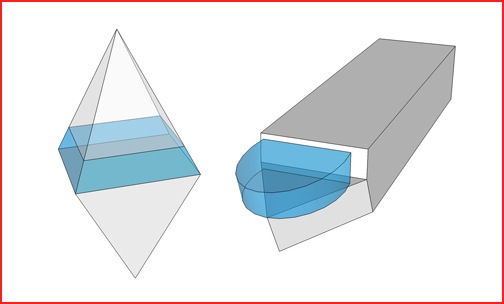
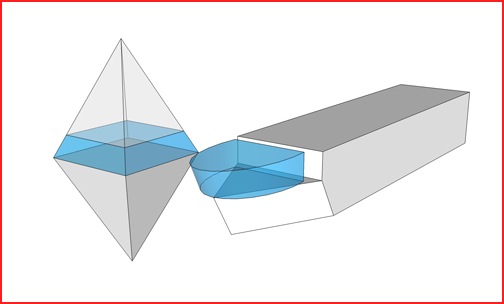
4. Toolmakers always mention diamond orientation, what's the influence on the life time of my tool and the quality of my lenses ?
Diamonds grow as a single crystal, and diamond tool manufacturers knew there were directions, the diamond was more
difficult to grind than other directions, so they choose for this "hard" direction to be the best suitable for cutting.
Now we know, there are applications, a different diamond orientation can give better results; especially when you use
tools on 2-axis lathes, it is important the tool wears equal along the cutting edge.
To determine the exact required crystal orientation, X-ray diffraction techniques can be used.
5. What's the difference between natural and synthetic diamond, and what's better for me?
There are tools made of very small particles of synthetic diamond, sintered together, called PCD ("poly crystalline
diamond"). Some people call this PCD: synthetic diamond.\PCD only can be used for diametering or rough cutting, because
the cutting edge of such a tool cannot grinded sharper than the grain size of the PCD.
When we mention synthetic diamond, we are talking about single crystal synthetic diamond.
Natural diamond has grown in the inside of the earth, and due to it's environs, changes in temperature and pressure,
they become diamonds with more or less inclusions, different colours and more or less disturbed crystal structure.
A synthetic diamond has grown in a vessel, under the same circumstances (temperature and pressure) as natural diamond.
These circumstances can be controlled, even other elements can be added. Therefor the quality can be more consistent
than natural diamond. The synthetic diamond, used for cutting tools, mostly is yellow. This colour, caused by the "built
in" nitrogen, gives the advantage of a higher heat conductivity, so less wear during cutting, and harder to certain
contact lens materials than natural diamond.
In short: for cutting contact lenses, it can be an advantage using synthetic diamond.
6. Is a bigger diamond better than a small one?
Although tools with big diamonds look as though you get more value for money, you must consider that smaller diamonds, mostly grew less distorted, and having less inclusions. The specific area, used for cutting, and the height, define the final dimensions of the diamond.
7. Why does my diamond tool wear?
Being the hardest known material, it doesn't mean diamond won't wear. While cutting contact lenses, two types of wear
can be distinguished:
(1) mechanical wear: constant applied forces, during cutting, eventually will wear the cutting edge.
(2) chemical wear: the fact that diamond is no more than carbon, this carbon reacts with other elements, especially at
elevated temperatures and with the presence of oxygen from the air.
8. Does the use of cutting coolants really help the diamond tool life or cutting performance?
Yes, due to the fact that a coolant, especially when sprayed as a mist, helps to reduce the cutting forces, keeps the
cutting temperature lower and partly replaces reactive oxygen from the air.
When cutting metal moulds, it can prevent material "built up" on the cutting edge.
9. What is a "relap", and is a "relapped tool" as good as a new tool ?
Relapping a tool is: carefully removing all damage and wear of the cutting edge by means of removing the upper layer of
the diamond. Important is to remove just enough diamond, to be sure all damage is disappeared. It isn't enough only
checking the cutting edge under a microscope with a high magnification (up to 800x), but one also have to check if the
original form ( waviness) of the radius is re-established. Only in that case the relapped tool is as good as new.
At Sub Micron Tooling, we ensure this by determination of the radius form of every tool, and measure its form before and
after relap. It also enables us to take off only that part of the diamond, that has worn, so the total life time of a
tool will increase.
10. Why does a new "sharp" tool sometimes generate a worse surface finish than a tool that has already been "run-in" ?
A new sharp, or relapped tool has an extremely sharp cutting edge. Grinding or relapping can introduce micro cracks into
the cutting edge. When cutting the first lenses, the micro cracks can pass into micro chips, which generate a worse
surface. After cutting a certain number of lenses, the cutting edge wears and the microchips will disappear.
By using sophisticated lapping machines with air bearings, these micro cracks can be avoided.
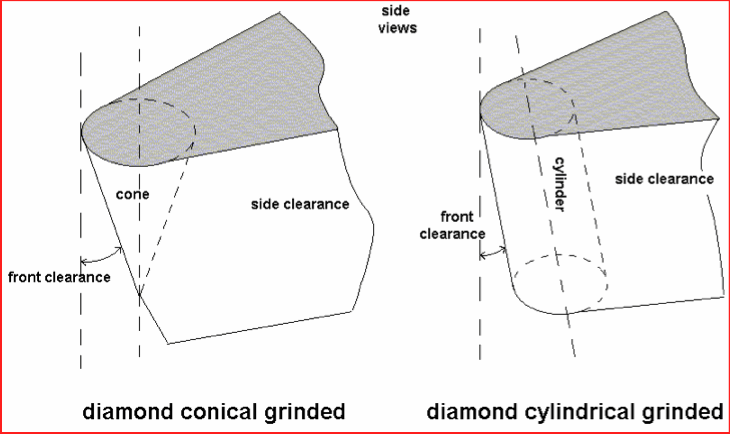
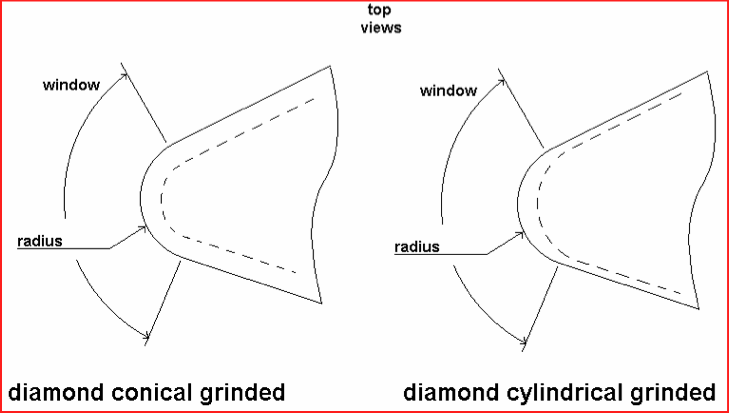
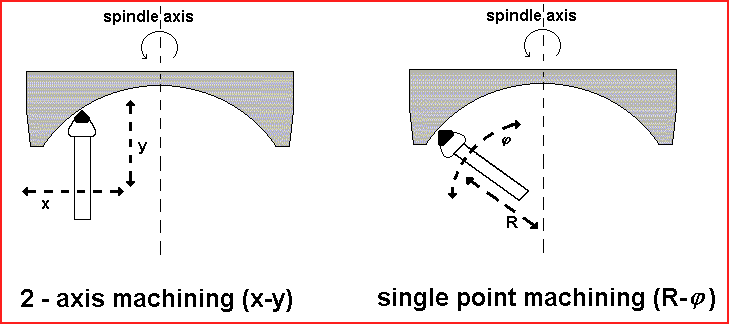
11. Should I use cylindrical or conical tools ?
For single point turning a cylindrical form of the radius is suitable. The advantage: the radius size doesn't change
after every relap. However keep in mind that from the point of the tool towards the sides, you will have less clearance.
For 2-axis lathing a conical shaped tool is preferable. Over the entire used "window" the clearance stays the same, so
also your cutting conditions. Disadvantage: the radius becomes smaller after every relap.
It is of great importance knowing the exact radius size of every new, or relapped tool. Our optical measuring system
ensures the radius size within 0,5 micrometer. this measurement is provided with every new tool and after every relap.
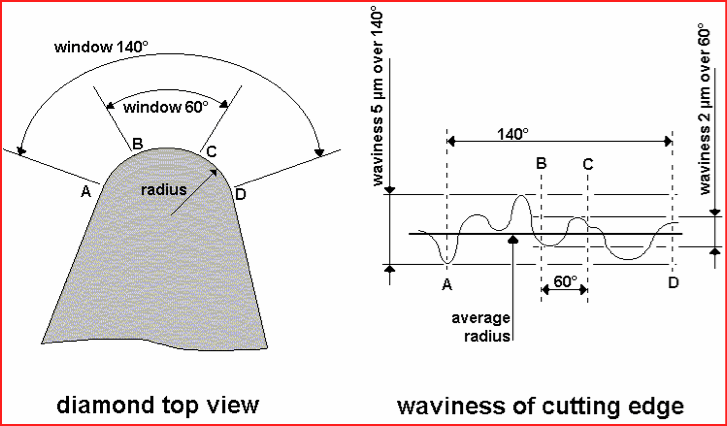
12. What's the difference between "Non Controlled Waviness" tools and "Controlled Waviness" tools and what do I need ?
We, at SMT, believe every diamond tool should be "controlled". We rather like to talk about "micron controlled
waviness", or "sub micron controlled waviness" tools.
Waviness means: the maximum peak to valley height of the profile, compared to the best fit circle.
Tools for single point turning don't have to have an extremely low waviness, but since we know that irregularities can
affect the surface quality, it is of importance to keep the waviness value < 2µm. For 2-axis machining it is important to
keep the waviness value < 0,5µm or better: < 0,25µm, depending on the lathe, you are using. Be sure, in this case,
always use a conical radius, combined with 0° rake angle, this ensures you a true circular cutting edge.
One can
understand, the lower the waviness value, the more expensive the tool. Therefor it is important to know, whether the
lenses are polished after cutting, or not. When polished, what's the max. allowed polishing time?
Knowing all
information, a suitable tool can be recommended, giving the best results at minimal costs.
13. Does a standard tool exist ?
Of course, there are certain tool parameters, which can be used for cutting different contact lens materials. Because
every individual contact lens-, IOL-, or mould manufacturer has different requirements regarding the kind of material to
be cut, production speed, surface-, and optical quality, etc.
It is highly recommended to obtain a tailor made solution from your diamond tool manufacturer.
14. Should I use insert type, or solid shank type tools?
Until some years ago, it was common to use a tool with a solid shank, sometimes the diamond was clamped, or set in
brass. Later on the first tools appeared with a vacuum brazed diamond.
For some applications: left-, right-, or straight tools were needed. A new lathe often required new tools.
Nowadays ISO inserts are available, with vacuum brazed diamonds. Per lathe, only one or more ISO holders are needed. A
standard ISO insert fits very precisely In these holders, so very accurate repeated mounting is possible. Whenever relap
is necessary, you only have to ship the insert. The use of an ISO insert system, can keep your diamond tool inventory
low.
15. Can I touch the diamond, and what's the best way to clean the cutting edge ?
Always try to prevent touching the cutting edge (the extremely sharp diamond cutting edge can cause a nasty wound).
After cleaning your hands very thorough, very small abrasive or metal particles can remain on your finger tips, and can
damage the cutting edge, when touching.
Use appropriate tools, to mount your diamond tool on the tool post.
For ISO inserts, use the special torx wrench, supplied with your new tools, or holder.
If, for any reason, you have to clean a diamond, use pure cotton wool, soaked with pure ethanol or iso-propanol. In case
you're not sure, whether your tool is damaged or not, send it to us for a free check-up.
I'm aware there are many more questions, even more questions than I can answer right away, but co-operation between
tool-, lens-, material- and lathe manufacturers, finally will result into a better knowledge of cutting processes.
The most easiest step can be made by the contact lens manufacturer and the tool supplier.
Relapping tools isn't just an exchange of repaired tools for money, but also an exchange of knowledge and experience:
called Tool Management®, which finally will lead to: a more clear insight into the complex phenomena of cutting lenses,
improved lens quality and overall cost reduction.
Technical explanation
Properties Of Diamond

History of diamond cutting
Diamond industry grown fast in Holland In the 16th century, Antwerpen and Amsterdam where major harbors for the direct sea route to India, where diamonds where then found. Due to the inquisition and the religious persecution in Spain, Portugal Germany and Poland, many people fled to Antwerpen and Amsterdam. Here some settled as diamond cutters, a craft which had no guild. In the old Dutch Republic of the 16th and 17th century, economy was booming. This initiated and stimulated the demand for more jewelry and a highly concentrated trade and industry started in the old Dutch harbors of Amsterdam and Antwerpen (now a city in Belgium).
Industry demands higher precision In the 19th century the industrial revolution pushed technology upwards. By the introduction of all kind of new materials and the higher specification of products and processes, some unique physical properties of diamond were recognized. Diamond also became more used as tool instead as jewel. More and more were needed but as well, a higher quality was demanded. Diamond cutters started to specialize and the first specialized diamond tool companies were founded in the 20th century.
Sub Micron Tooling, a young company...but long experience at Philips, Mr. F. van Tongeren was having his profession as a diamond tool maker from 1938 onwards. His son, Mr. N. van Tongeren followed his father foot steps at Philips, and worked at Philips Diamond Tools from 1983-1995. In 1995 Mr. van Tongeren founded Sub Micron Tooling. Here, a 3rd generation from the van Tongeren's family joined the diamond tooling profession.
Examples Radius wear
At 800 x with use of Interference you can see cutting edge wear; on the photo this
is visible by the dark line just
behind the cutting edge.
Cutting edge wear is normal wear, caused by normal use.
On this photo you can see stress in the diamond, particular in the radius part.
This stress is caused by the diamond grinding process of the radius...
By higher magnification and the use of interference you can see cutting edge wear. A number of electrostatic discharges are found on the cutting edge, the largest discharge has created a kind of chip on the cutting edge. The electrostatic discharges are caused by sparks between tool and workpiece during use.
Heavy cutting edge wear, damage and chipping caused by electrostatic discharges.
Shown is the front of the radius; severe wear on the clearance (or relief) of the tool. The clearance is damaged over a rather large part (~120µm deep).
By looking at the conical clearance of this tool with interference you can see damage on this part of the tool. This damage is being caused by material from workpiece during cutting and is similar to crater wear on the rake side of the tool. During relap this damage, as a result the decreasing height, is found back in the cutting edge as tiny chips or irregularities.
Severe form wear (application is aluminium optical mold production) as seen from the top and as seen from the front, where the radius cone is visible.
Cutting edge wear, Crater wear, Chips, Form wear.
Crater wear is caused by the chip, hitting the rake face of the tool while being
very hot (can be up to over 1200°C).
However the wear is visibly big (leaving a kind of a crater) it is rather undeep:
just ~3µm deep!!!.
At 1000x magnification with use of interference you can see cutting edge wear and some irregularities plus a very small chip. This wear is caused by normal use.
At 800 x Nomarski you can see cutting edge wear + electrostatic discharges. Chipping has also heavy damaged the cutting edge.
At 800 x Nomarski you can see al large number of very small chips.
These chips are probably caused by tension or stress in the diamond (due to forcing
during grinding the radius).
Cutting edge wear(double line behind the cutting edge) By using the interference you
see crater wear . (also are there
lines on the diamond caused by relapping of the tool).
Cutting edge wear and crater wear are caused by normal use of the tool.
Crater wear is being caused by material from the workpiece while cutting.
Cutting edge wear , light crater wear, light chipping and light damage on the
cutting egde, severe form wear
(deformation of the original radius shape).
Also shown is the front of the radius; severe wear and damage on the clearance (or
relief) of the tool. The clearance is
damaged over a rather large part (~150µm deep).
Crater wear on centre and centre left side of the radius. Cutting edge wear (edge is
slightly rounded off) on centre and
centre left side of the radius.
Light damage on the edge and clearance of the tool due to electrostatic discharges.
Diamond is cracked due to some accident. The crack is making the weak orientation visible of the diamond.
Severe cuttig edge wear + form wear + crater wear + large chips, all causing rings
on the surface of the lens. As
visible, a kind of finger print is left behind...
Also note the severe form wear on the right side, used for roughing.
Severe cuttig edge wear + form wear + clearance wear, all causing rings on the
surface of the lens. In this case the
rings are formed by burning zones, as material is not being cut but rather forced
off.
Application: single point turning on Gfeller lathe.
Styli wear patterns gallery
This type of wear is created during the engraving process. The original sharp tip wears down as it is being used longer, or more intensive, and finally becomes blunt. In some cases it will wear down and form a sort of a radius shape.
The part of the tool which is used for cutting (engraving ) can be defined as the cutting edge .Engraving a copper cylinder is actually a cutting or lathe process, and therefore you can define the two sides of the tip as a cutting edge . Like the tip, the cutting edge is subject to a similar wear process. The edge will wear down more as it is being used longer or more intensive. In practice this means that the edge will round off and become blunt.
During th engraving, the diamond is being used to cut a cell shape in a copper cylinder. During this cutting process, cell material that is actually cut out of the cylinder, flows along the tip and sides of the styli. Due to this flow of chip material the clearances and rake will wear down. As tools are being used for a longer period, this type of wear will increase. By the shape of the wear pattern on the rake of the diamond, one can sometimes tell the direction of the air flow, for chip removal. Sometimes the wear shape can also tell something about the cell symmetry. (Note: on the 1st picture, the black silhouettes are remains of copper engraved cells.)
Theoretically the clearances, or relief angles, of the styli are these parts of the tool tip that during cutting are not in contact with the cylinder. Though it is subject to wear in two ways; the clearance comes in touch with the copper as the tip cuts in and out of the cylinder due to which it will wear. The second way is that due to the chip removal, and chips flowing over the clearances, crater wear will develop on these parts of the styli.
Chips break out of the tip and cutting edge of the diamond . This phenomenon can be
due to several different causes. The
tool is vibrating during cutting. The tool is bumping instead of a making gentle
cutting motion. Diamond is very hard
but also brittle and sensitive for vibration. An inferior diamond quality or a bad
cutting quality can also contribute
to this phenomenon. Stress in the diamond, inclusions, disturbances in the crystal
lattice can all have a negative
effect on the quality of the diamond as a tool. The last cause of chipping can be
found in very long or intensive use.
The tip and edges will wear down completely and become blunt, due to which cutting
forces will rise and result into
chipping.
As can be seen on the 2nd and 3rd picture (taken from one single tool), the chip
doesn't always break down deeply but
can be big though shallow.
Tiny pieces or particles of diamond break out of the tip and the edge. See also "Chips".
This type of damage can originate in the same way as described above. Big difference is that the sides are not used for cutting . This type of damage is not process related. It can be caused by cleaning the tool tip due to which the diamonds are damaged.
This type of wear can be characterised as a deformation of the original shape. It is caused by the wearing of the tip and sides. Form wear will appear only after long use and has an effect on the quality of the engraved cells and their shape. This wear type can give information on the symmetry. When one side is more worn than the other, this can indicate that it is not cutting well. As a result it will not cut symmetric cells.
The tip of the diamond is completely broken. The cause of this must be found in a complex whole of different parameters. All previously mentioned factors, all process parameters (of making and using diamond tools) plus the quality of the copper cylinder can have an effect, or have influence on each other. The differences between chips and fractures are subtle.
One of the properties of diamond is the difference in hardness in different directions of the crystal. In some directions diamond can easy be cleaved while in some directions this is nearly impossible. These differences in hardness are related to the orientation of the crystal lattice. In some cases the diamond breaks during use in the direction or along such a cleavage plane. Because it breaks along the cleavage plane of the diamond a new sharp tip is being formed with a different included angle. The cause for this can be found in a combination of physical properties of the diamond, and all previous named causes which can lead to fracture.
An example of typical wear on burr cutters. The regularity of the distances between the wear lines are very common on burr cutters and shoes.
V-groove
Grooving tool.
Grooving tool; typical clearance wear due to the tight relief angles.
Extreme form wear + crater wear on very small grooving tool.
Application: grooving lines at 200 periods per mm, turned on Hembrug lathe.
Diamond orientations
The chrystal orientation is recognisable by the visible growing lines.
Visible growing lines in synthetic monocristal 4-point orientation [001].[001]
Visible growing lines inside of diamond.
Visible Ent Cristal; the synthetic Borium doped. Orientation: [1.0.0.].[1.0.0.]
Distortion in orientation of diamond. Shifted pattern in growing lines.
Static discharges
Manual for use and handling of diamond tools
Why a manual for diamond tools?
Diamond is often a synonym for expensive, rare and mysterious. These definitions are
strongly associated with the jewel
industry which propagates this image for commercial reasons. The diamond tool
industry is strongly related to the jewel
industry. Toolmakers are coming from this industry or are in an indirect way
influenced by it. The above described image
is not only propagated to the outside world but also within the diamond tool
industry.
Specially the mysterious haze surrounding diamond is responsible for confusion and
obscurity among the users of diamond
tools. Often the industry is only indicating what you are not allowed to do, "do not
touch the diamond with your
fingers......it is very sharp!" This manual is not supposed to be a list of do’s and
don’ts, but rather a practical
guide.
Packing of diamond (for transportation)
There are many creative ways in packing diamond tools. Every supplier has their own
solution. We as well have a standard
package that is evaluated often.
The main point every package must comply to is that it prevents the diamond from
bumping against hard surfaces. Diamond
of course is very hard but also brittle. To prevent the diamond from bumping against
other surfaces, it can be
surrounded by cotton-wool. This will also work as a shock absorber during
transportation. Always use new, clean pure
cotton-wool and change them every time before transport. This way you assure that
there is no dirt in the cotton-wool
damaging the diamond tip. Preferable is a package in which the tip of the diamond is
not touching any material.
By the way, never mention on the outside of parcel that there are diamonds inside.
Cleaning
There are several possible reasons for cleaning the diamond or tool. For instance,
when material builds up (or chip
material) on the diamond or holder and causes problems during use. This material
built up or chip material can be
removed by wiping carefully over the rake side of the diamond with a (pure) cotton
bud soaked with alcohol or acetone.
Always wipe away from the tip or edge, never towards the tip of the diamond. After
use throw away the cotton-bud, it is
not good for reuse. When you are cleaning the diamond with a cotton-bud, small
(metal) parts might come into the
cotton-bud. Reusing the cotton-bud and can damage the tip or edge of the diamond.
Ultrasonic cleaning is a safer
alternative, the diamond is not touched while cleaning and therefore damage is quite
impossible. While cleaning you
always run the risk of damaging the diamond, therefore by way of precaution always
follow the above instructions. A
mouse pad is an ideal safe and soft workplace.
When tools are send for relap or repair it is not necessary to clean them first, the
material built up or chip material
on the tool can give us information about the use, and damage will be minimised.
Inspection
When you need to inspect the diamond before use it is best not to clean before
looking at it. In case you want, or need,
to clean first always follow the above instructions. Inspection can be best done
using an interference microscope. A
normal microscope or magnifying glass makes it almost impossible to see the
difference between damage, dirt or grease.
One of the properties of diamond is that it attracts grease. Even for the expert eye
it is sometimes difficult to see,
at a magnification up to 1000 x with use of interference, the difference between a
microchip and small particle of dirt.
With every repair , relap or new tool the measurement and image of end - inspection
is stored. If needed this inspection
can be restored. By looking with polarised light trough a microscope, tension and
cracks in the diamond, and even the
crystal lattice can be observed.
When you inspect the diamond after use the above guideline is also applicable. Of
course you can always ask for a
detailed inspection report on your repaired tools.
ISO insert and ISO holders
For many type of machines there are ISO insert systems available. The cemented carbide insert has standard dimensions. Sometimes users or suppliers adjust the insert, due to which the original fitting will change, and vibration of the tool is possible. The fitting of the ISO holder is supposed to be conform the specifications. Wear and damage to the holders is possible and can be responsible for bad cutting results. When mounting the inserts in the holder, clean both the bottom of the insert and the fitting. Always use the matching torx screw, for the 35° and 55° ISO insert is this a standard M 2,5 torx screw. Use a small and light wrench, a heavy wrench gives, when accidentally slipping more damage than a light one. This due to the difference in mass.
"Everything You Always Wanted to Know About Diamond Tools, .... But Were Afraid to Ask"
Fifteen most asked questions about diamond tools.
by: Nico van Tongeren, Sub Micron Tooling B.V., 1998.
Especially contact lens, IOL, and mould manufacturers aren't afraid asking about
diamond tools, because they know the
diamond tool plays a very important role in the final lens quality and production
price. In general they have a lot of
knowledge regarding lens design, (lens) materials and even lathes.
However during the last 15 years, visiting, and talking to customers, I became more
and more aware of the need for
explanation regarding diamonds in general, their use, parameters etc.:
1. Why use diamond tools for contact lens cutting?
The fact that diamond is the hardest material, and a single crystal (the cutting edge can be grind extremely sharp) makes it very suitable as a cutting tool.
2. Are all diamonds the same?
Diamonds are found all over the world and have been formed under different circumstances. All kind of elements, impurities are "built in", so one can imagine that this has it's influence on the behaviour of the diamond tool.
3. Is there a difference between "industrial" diamonds and diamonds for jewellery?
Diamonds for jewellery (gem stone quality) are selected to perform, after polishing,
as a jewel: shiny, clear, near
white and no inclusions to be seen.
Diamonds used for cutting tools, are selected based upon their use: so yellowish
stones are acceptable, but inclusions
can affect the performance of a diamond tool and have to be avoided, at least near
the cutting edge.
4. Toolmakers always mention diamond orientation, what's the influence on the life time of my tool and the quality of my lenses ?
Diamonds grow as a single crystal, and diamond tool manufacturers knew there were
directions, the diamond was more
difficult to grind than other directions, so they choose for this "hard" direction
to be the best suitable for cutting.
Now we know, there are applications, a different diamond orientation can give better
results; especially when you use
tools on 2-axis lathes, it is important the tool wears equal along the cutting edge.
To determine the exact required crystal orientation, X-ray diffraction techniques
can be used.
5. What's the difference between natural and synthetic diamond, and what's better for me?
There are tools made of very small particles of synthetic diamond, sintered
together, called PCD ("poly crystalline
diamond"). Some people call this PCD: synthetic diamond.\PCD only can be used for
diametering or rough cutting, because
the cutting edge of such a tool cannot grinded sharper than the grain size of the
PCD.
When we mention synthetic diamond, we are talking about single crystal synthetic
diamond.
Natural diamond has grown in the inside of the earth, and due to it's environs,
changes in temperature and pressure,
they become diamonds with more or less inclusions, different colours and more or
less disturbed crystal structure.
A synthetic diamond has grown in a vessel, under the same circumstances (temperature
and pressure) as natural diamond.
These circumstances can be controlled, even other elements can be added. Therefor
the quality can be more consistent
than natural diamond. The synthetic diamond, used for cutting tools, mostly is
yellow. This colour, caused by the "built
in" nitrogen, gives the advantage of a higher heat conductivity, so less wear during
cutting, and harder to certain
contact lens materials than natural diamond.
In short: for cutting contact lenses, it can be an advantage using synthetic
diamond.
6. Is a bigger diamond better than a small one?
Although tools with big diamonds look as though you get more value for money, you must consider that smaller diamonds, mostly grew less distorted, and having less inclusions. The specific area, used for cutting, and the height, define the final dimensions of the diamond.
7. Why does my diamond tool wear?
Being the hardest known material, it doesn't mean diamond won't wear. While cutting
contact lenses, two types of wear
can be distinguished:
(1) mechanical wear: constant applied forces, during cutting, eventually will
wear the cutting edge.
(2) chemical wear: the fact that diamond is no more than carbon, this carbon
reacts with other elements, especially at
elevated temperatures and with the presence of oxygen from the air.
8. Does the use of cutting coolants really help the diamond tool life or cutting performance?
Yes, due to the fact that a coolant, especially when sprayed as a mist, helps to
reduce the cutting forces, keeps the
cutting temperature lower and partly replaces reactive oxygen from the air.
When cutting metal moulds, it can prevent material "built up" on the cutting edge.
9. What is a "relap", and is a "relapped tool" as good as a new tool ?
Relapping a tool is: carefully removing all damage and wear of the cutting edge by
means of removing the upper layer of
the diamond. Important is to remove just enough diamond, to be sure all damage is
disappeared. It isn't enough only
checking the cutting edge under a microscope with a high magnification (up to 800x),
but one also have to check if the
original form ( waviness) of the radius is re-established. Only in that case the
relapped tool is as good as new.
At Sub Micron Tooling, we ensure this by determination of the radius form of every
tool, and measure its form before and
after relap. It also enables us to take off only that part of the diamond, that has
worn, so the total life time of a
tool will increase.
10. Why does a new "sharp" tool sometimes generate a worse surface finish than a tool that has already been "run-in" ?
A new sharp, or relapped tool has an extremely sharp cutting edge. Grinding or
relapping can introduce micro cracks into
the cutting edge. When cutting the first lenses, the micro cracks can pass into
micro chips, which generate a worse
surface. After cutting a certain number of lenses, the cutting edge wears and the
microchips will disappear.
By using sophisticated lapping machines with air bearings, these micro cracks can be
avoided.
11. Should I use cylindrical or conical tools ?
For single point turning a cylindrical form of the radius is suitable. The
advantage: the radius size doesn't change
after every relap. However keep in mind that from the point of the tool towards the
sides, you will have less clearance.
For 2-axis lathing a conical shaped tool is preferable. Over the entire used
"window" the clearance stays the same, so
also your cutting conditions. Disadvantage: the radius becomes smaller after every
relap.
It is of great importance knowing the exact radius size of every new, or relapped
tool. Our optical measuring system
ensures the radius size within 0,5 micrometer. this measurement is provided with
every new tool and after every relap.
12. What's the difference between "Non Controlled Waviness" tools and "Controlled Waviness" tools and what do I need ?
We, at SMT, believe every diamond tool should be "controlled". We rather like to
talk about "micron controlled
waviness", or "sub micron controlled waviness" tools.
Waviness means: the maximum peak to valley height of the profile, compared to the
best fit circle.
Tools for single point turning don't have to have an extremely low waviness, but
since we know that irregularities can
affect the surface quality, it is of importance to keep the waviness value < 2µm. For 2-axis machining it is
important to keep the waviness value < 0,5µm or better: < 0,25µm, depending on the lathe, you are using. Be
sure, in this case, always use a conical radius, combined with 0° rake angle, this ensures you a true circular
cutting edge.
One can
understand, the lower the waviness value, the more expensive the tool. Therefor
it is important to know, whether the
lenses are polished after cutting, or not. When polished, what's the max.
allowed polishing time?
Knowing all
information, a suitable tool can be recommended, giving the best results at
minimal costs.
13. Does a standard tool exist ?
Of course, there are certain tool parameters, which can be used for cutting
different contact lens materials. Because
every individual contact lens-, IOL-, or mould manufacturer has different
requirements regarding the kind of material to
be cut, production speed, surface-, and optical quality, etc.
It is highly recommended to obtain a tailor made solution from your diamond tool
manufacturer.
14. Should I use insert type, or solid shank type tools?
Until some years ago, it was common to use a tool with a solid shank, sometimes the
diamond was clamped, or set in
brass. Later on the first tools appeared with a vacuum brazed diamond.
For some applications: left-, right-, or straight tools were needed. A new lathe
often required new tools.
Nowadays ISO inserts are available, with vacuum brazed diamonds. Per lathe, only one
or more ISO holders are needed. A
standard ISO insert fits very precisely In these holders, so very accurate repeated
mounting is possible. Whenever relap
is necessary, you only have to ship the insert. The use of an ISO insert system, can
keep your diamond tool inventory
low.
15. Can I touch the diamond, and what's the best way to clean the cutting edge ?
Always try to prevent touching the cutting edge (the extremely sharp diamond cutting
edge can cause a nasty wound).
After cleaning your hands very thorough, very small abrasive or metal particles can
remain on your finger tips, and can
damage the cutting edge, when touching.
Use appropriate tools, to mount your diamond tool on the tool post.
For ISO inserts, use the special torx wrench, supplied with your new tools, or
holder.
If, for any reason, you have to clean a diamond, use pure cotton wool, soaked with
pure ethanol or iso-propanol. In case
you're not sure, whether your tool is damaged or not, send it to us for a free
check-up.
I'm aware there are many more questions, even more questions than I can answer right
away, but co-operation between
tool-, lens-, material- and lathe manufacturers, finally will result into a better
knowledge of cutting processes.
The most easiest step can be made by the contact lens manufacturer and the tool
supplier.
Relapping tools isn't just an exchange of repaired tools for money, but also an
exchange of knowledge and experience:
called Tool Management®, which finally will lead to: a more clear insight into the
complex phenomena of cutting lenses,
improved lens quality and overall cost reduction.
Technical explanation
Properties Of Diamond